Category Archives: SharePoint Development

Programmatically enforcing a field value uniqueness in SharePoint 2010

The following code snippet shows how to programmatically modify a field to enforce the uniqueness of its values (like the unique constraint in SQL Server).

SPField titleField = myList.Fields.GetField(“Title”);
titleField.Indexed = true;
titleField.EnforceUniqueValues = true;
titleField.Update();

Oh, and this only applies to SharePoint 2010, Unique fields are completely new to 2010..

Hope this helps!

Now on CodePlex: SPListConfiguration Feature

SPListConfiguration is a SharePoint feature that developers can use to configure their SharePoint lists using XML and without the need of writing .NET code.

SPListConfiguration can be used for many different purposes. For example, you can use it to set most of theproperties for the 5SPList object that references your list or to stop inheriting permissions from the parent web. You can even use it to add properties to the property bag of the list root folder.

For configuring a list using SPListConfiguration, you should specify the list name in the preoperty Key and the desired configuration settings in the property value as shown below :

<Properties>
<Property Key=”Calendar” Value=”Hidden,true;EnableVersioning,false;AddToPropertyBag,MyKey:MyValue”/>
<Property Key=”Tasks” Value=”BreakRoleInheritance,false;ReadSecurity,2″/>
</Properties>

The previous XML does the following on your behalf :
SPList.Hidden = true;
SPList.EnableVersioning= false;
SPList.BreakRoleInheritance(false);
SPList.ReadSecurity = 2;
And it also adds a property of name “MyKey” and value “MyValue” to the property bag of the SPlist root folder. Neat, eh ? This is the Reflection magic:)

SPListConfiguration can be used in two ways:

1) From a site definition; in the <WebFeatures> element.

<WebFeatures>
<Feature ID=”9697591b-c325-43e8-bf2f-3c33e05c59b4″>
<Properties>
<Property Key=”Calendar” Value=”Hidden,true;EnableVersioning,false;AddToPropertyBag,MyKey:MyValue”/>
<Property Key=”Tasks” Value=”BreakRoleInheritance,false;ReadSecurity,2″/>
</Properties>
</Feature>
</WebFeatures>

2) Since the key component of this feature is its feature receiver which performs all the heavy lifting,
you can only use the feature receiver assembly and hook it up as a receiver for your features :

<Feature Id=”ID of Your Feature” Title=”Countries List”
Description=”A list that contains all the countries of the world”
Hidden=”FALSE” Scope=”Web”
ReceiverAssembly=”SPListConfigurationFeature, Version=1.0.0.0, Culture=neutral,
PublicKeyToken=064ae22bb48e8f1b”
ReceiverClass=”SPListConfigurationFeature.SPListConfigurationFeature”
xmlns=”http://schemas.microsoft.com/sharepoint/”&gt;
<ElementManifests>
<!– The countries List is created here –>
<ElementManifest Location=”elements.xml”/>
</ElementManifests>
<Properties>
<!– The countries List is configured here –>
<Property Key=”Countries” Value=”Hidden,true;BreakRoleInheritance,false”/>
</Properties>
</Feature>

Also keep in mind that you set any list properties of type String, Boolean or Int32 and this covers almost 95% of the available properties.

Let me know what you think !

Four reasons TO directly query SharePoint logging database

Remember my post “Five reasons not to directly query SharePoint databases” ? I have cautioned you more than once throughout it NOT to directly query SharePoint databases and I have mentioned its disadvantages and problems. If you haven’t read this post, I would encourage you to do that before carrying on.

I’m not contradicting myself! The first post was all about SharePoint 2007 but now I’m talking about the new and the amazing 2010 version of SharePoint.

So you might be asking “What the hell is SharePoint Logging Database?”  Good question!

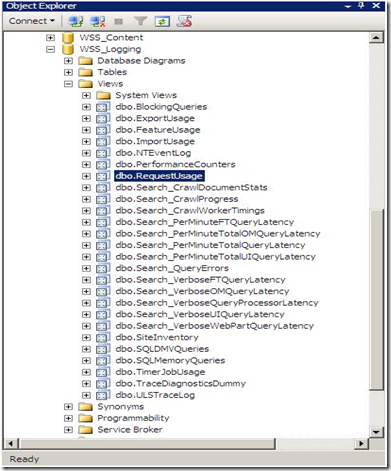
To answer you, please fire up the SQL Management Studio, and expand your databases. You’ll notice a new one named WSS_Logging.

1

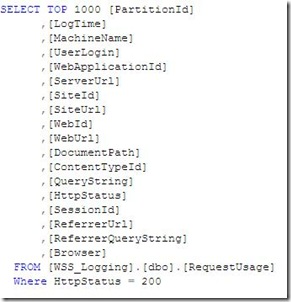
SharePoint 2010 keeps tracks of everything it does by logging into the WSS_Logging Database. It  aggregates all of the raw logging data accumulated in the text files under the 14 hive and imports it into this wonderful logging database. This is the ONLY database in SharePoint that Microsoft will be happy to let the developers directly read, query and build reports against it. There is a bunch of useful views at your disposal, the one that I will show you now is  the “RequestUsage” View.

Every time a user visit generates a page request, a record is inserted into one of the partitioned tables in this database and the “RequestUsage” view is kind enough to union all the data in the partitioned tables and presents it to you to consume in your custom solutions (Web Parts, Reports, Application Pages,…). An example is shown below :

2


Let’s dive a little bit deeper to see what happens behind the scenes and where this data come from.

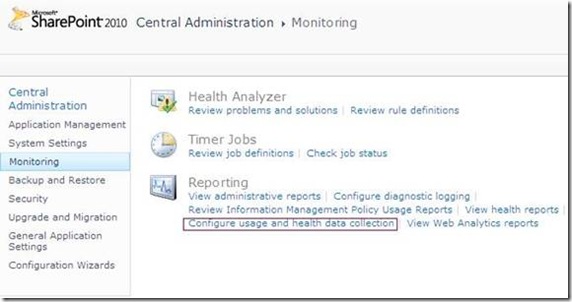
1)  Navigate SharePoint 2010 Central Administration > Monitoring > Configure usage and health data collection.

3

4


5


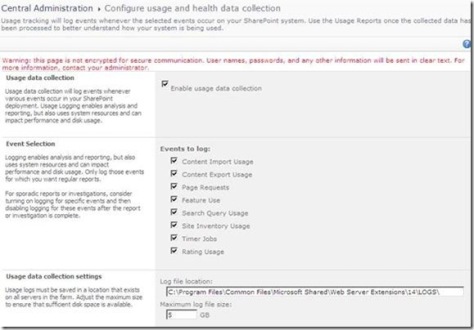
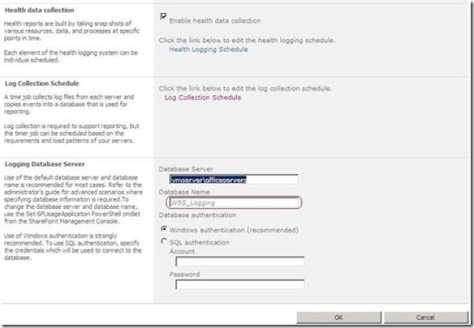
3) Did you notice the “Log Collection Schedule” section ? This implies that there is a timer job that collects  the log files located under the 14 hive and copies the events you specify into your logging database which can be employed later for reporting purposes. You can even schedule this timer job based on the load patterns of your server as you will see in the next step.

4) I have opened up my favorite troubleshooting tool ( SharePoint Manager) 2010) to track this job. As you can see in the figure below, I have configured the “Microsoft SharePoint Foundation Usage Data Import” job from the central administration to run every minute.

8

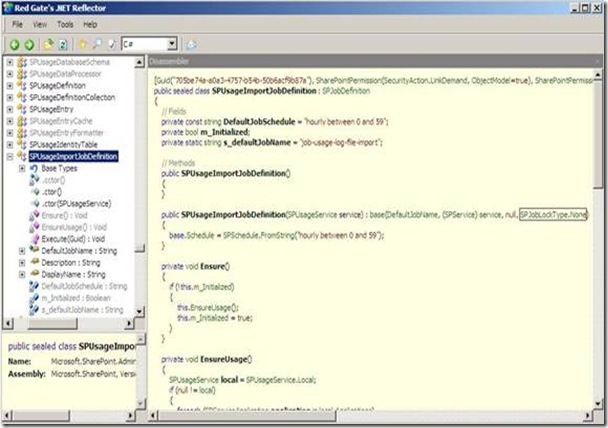
5) Out of curiosity, I have decided to use .NET Reflector to check out how this timer job works, I have noticed two things.

9

The first one is that the Job lock type specified in the constructor is SPJobLockType.None which instructs the Timer Service to run this job on all the Web Front Ends in the farm, this makes sense!

The difference between the Job and the None LockTypes is that the Job LockType ensures that the timer job only runs on one server but the None ensures that the job runs on every server.

10

Forcing the Execution of Timer Jobs in SharePoint 2010

Since you are here, You have probably read my Understanding SharePoint Journal bonus issue about SharePoint troubleshooting or my blog post “Forcing the execution of timer jobs” where I discussed debugging custom timer jobs.

That’s what I have written four or five months ago:

“You will probably need to execute your timer jobs outside of their scheduled times when you are developing, troubleshooting, or testing your custom timer jobs. Unhappily, this is not possible from Central Administration, but you can work around that using the SharePoint object model”

Of course this was all about SharePoint 2007 but NOW in SharePoint 2010, Microsoft has made it easier for us, you can directly force the execution of any timer job by just pressing a button! Awesome!

1


“People who suffered from this limitation in SharePoint 2007 will really appreciate this…

A feature that I really appreciate in InfoPath 2010 and SharePoint 2010

2Microsoft heard our feedback guys and took them very seriously regarding the portability of the solutions created in the development environments. You can now take all the lists, libraries, site assets, data and forms, package them up all into one file and easily deploy them onto different environments!

Now, the question is “What about InfoPath forms?”

In InfoPath 2010, all the links you have to external data are now relative, so when you move that form to different environments, those links will continue to work.. I really appreciate this!

SharePoint 2010 Developer Dashboard Visualizer

SharePoint 2010 Developer Dashboard Visualizer is a jQuery-based solution that extends the Developer Dashboard by plotting an interactive diagram with data from the Developer Dashboard, giving you an **instant** insight into where the bottlenecks are in your code.

Get SharePoint 2010 Developer Dashboard Visualizer from here and let me know what you think!

Reusable and Globally Reusable Workflows in SharePoint 2010

“SharePoint Designer Workflows” is nothing new, we’ve had that in 2007 as well. In SPD 2007, workflows were not reusable. Once you have defined a workflow, you cannot move that workflow to another list or reuse it somewhere else.

NOW in SharePoint 2010, this is possible! You can create reusable workflows and attach them to more than one list.

“Reusable workflows” is one of the coolest features in SharePoint 2010, however when I opened up SPD for the first time, I was a bit confused because I noticed two different terms “Reusable Workflows” and ‘Globally Reusable Workflows”.

1


When you create a Reusable workflow in SharePoint Designer 2010, it’s by default reusable within the site it has been created in, which means that it can be attached to any list within this site. But what if you want your workflow to be reusable in the whole site collection ? Well, this is the definition of “Globally Reusable Workflows”. You can easily convert your workflows to be available anywhere in your site collection by opening your workflow and clicking on “Convert to Globally Reusable” from the ribbon as shown below.

2


3


Also it’s worth mentioning that only the workflows created at the root level of the site collection can be converted to be Globally Reusable but other ones created in sub sites cannot. Try to create a workflow in a sub site , open it and note that the Conversion button is dimmed.

4


Another important question is what if I want to take my workflow and give it to somebody else in a different site collection? There’s another button in the ribbon called “Save as Template”, this takes the workflow, put it in a wsp file and save it to the ‘Site Assets” library. You can export this file and deploy it to other site collection and what’s really cool is that you can import this wsp into Visual Studio and extend it over there. Very cool stuff! Thanks Microsoft for this  feature!

6


7

Creating Folders using Modules

Sometimes, you will find yourself in a situation that you not only provision pages to SharePoint content database, but also you need to create folder in which those pages will be provisioned.

Consider the following example :

 <File Url="MyPagesFolder/MyPage.aspx" />

This way, you can use the URL attribute of the file element to create folders in your site. SharePoint will create the folder “MyPagesFolder”  if it doesn’t exist. You can do this trick either within the URL attribute of the Module element or the file element.

Another point to consider in the previous example is that I omitted the Path attribute which makes the URL attribute acts as both (URL and path), so now SharePoint will get files from MyPagesFolder relative to the feature folder, then it will create a folder called MyPagesFolder and provision MyPage.aspx to it.

Differences between Ghostable and GhostableInlibrary

A common source of confusion is is the Type attribute of the file element used when creating a module to provision files in SharePoint database.

You can set this attribute to Ghostable or GhostableInLibrary or you can leave it alone and not to set it meaning that it’s “Unghostable“.

Ghostable and GhostableInLibrary –> Specifies that the file be cached in memory on the WFE. Both values specify that the file be cached, but GhostableInLibrary specifies that the file be cached as part of a list whose base type is Document Library and that you can work with the file as you would with any other file in the library ( check-in, check-out, version history).

When changes are made, for example, to the home page through the UI, only the differences from the original page definition are stored in the database, while default.aspx is cached in memory along with the schema files. The HTML page that is displayed in the browser is constructed through the combined definition resulting from the original definition cached in memory and from changes stored in the database.

If you don’t set a value this means that the file is Unghostable implying that the file will not be cached in memory in WFE and that it’ll be completely stored in the database.

Managing Property Bags through SharePoint Designer!

Continuing our discussion about “Property Bag”, I have recently discovered that end users can manipulate their SharePoint sites property bags through SharePoint Designer 2007.

To view the property bag.  Go to Site -> Site Settings.  Then click on the Parameters tab.  On this tab, you will be able to see the values of all of your custom property bag values.

63

62