A question that I always receive from my colleagues! What is the limited access permission level ?
Users with permissions to access specific lists ONLY, will have Limited Access permission level within the parent site. And this works in the same way for list items and list folders. Remember that a list inherits from a site and a folder inherits from a list and a list item inherits from a folder or a list. The Limited Access permission level cannot be customized or deleted and you cannot assign this permission level to users or SharePoint groups.
For more information about “Limited Access” permission level, I’d recommend usingSPLimitedAccessDiscovery which breaks down why some accounts show up on SharePoint sites as “Limited Access”.
Monthly Archives: February 2009
SharePoint List Association Manager
AW Systems has just released an open source tool called SLAM (SharePoint List Association Manager). Check it out now on CodePlex at http://www.codeplex.com/SLAM.
SLAM lets us do just that by allowing developers to describe complex relationships between lists and content types in a way not previously possible in SharePoint (at least not without a great deal of time and effort). With SLAM, these associations are managed automatically. Developers can then concentrate on building web parts and Custom Field Types that draw on those relationships using familiar and straightforward SQL queries.
SharePoint Customization Tricks – Part 3
This multipart series of articles is intended to help you getting ramped up with SharePoint Customization. It’s about modifying the default SharePoint user experience, list forms customization, branding, skinning SharePoint portals, etc.
In Part 1, I introduced a generic function that you can use to hide the list view toolbar menu items (e.g. New Item, Upload, Edit in Grid view, etc.). In Part 2, I showed you how to remove items from the list form toolbar. If you haven’t read both posts yet, I would encourage you do to that first .
After posting the previous articles, I received a lot of e-mails from SharePointers asking how to rename the items in the list form toolbar. That’s why I decided to write Part 3 in the series. After I finished writing the article and taking some snapshots, another SharePointer asked me on MSDN Forums if it’s possible to remove the Text while retaining the images, for instance, removing “Delete Item” while retaining the (X) rendered beside it. Today I’ll show you to do both tasks by JavaScript.
Trick #4: Renaming List Form Toolbar Items!
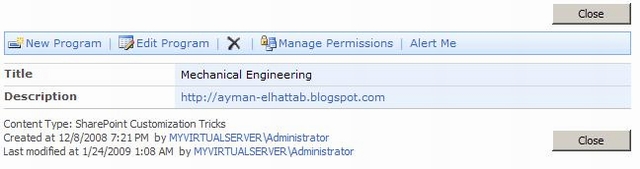
Sometimes, you need to rename some items in the toolbar rendered at the top of DispForm.aspx to match the List Name. For instance, you have a custom list named “Programs” that stores the courses offered by a university. It would be better to have “New Program” rather than the default “New Item” and “Edit Program” rather than “Edit Item”. Sometimes, you just need to totally delete the text and just leave the images with a tooltip that explains the action performed on clicking them.
Before

After
This function can be used to achieve both tasks, just call the function passing the old and new names of the item. For instance if you need to rename “Add Item” to “Add Program”, use renameFormMenuItems(“Add Item”,”Add Program”);. In case you need to remove the text and leave the image, call the function passing an empty string as the new name as follows: renameFormMenuItems(“Delete Item”,””);.
Kindly note that the function is case sensitive, so “New Item” will work while “nEw iTeM” is not gonna work.
Nice and easy, isn’t it?
Now a question is imposing itself, how can we use this function? The answer is the content editor web part; please refer to trick #3 in the previous article for more information.
What about hiding the toolbar altogether?

There are a lot of solutions that imply unghosting the page using SharePoint Designer, but I don’t prefer those solutions! Again, let’s perform this task using JavaScript. I’ve included two functions in the zip file, one for renaming the toolbar items and the other for hiding the toolbar altogether! Waiting for your feedback.
SharePoint Customization Tricks – Part 4
This multipart series of articles is intended to help you getting ramped up with SharePoint Customization. It’s about modifying the default SharePoint user experience, list forms customization, branding, skinning SharePoint portals, etc.
In Part 1, I introduced a generic function that you can use to hide the list view toolbar menu items (e.g. New Item, Upload, Edit in Grid view, etc.). In Part 2, I showed you how to remove items from the list form toolbar. If you haven’t read both posts yet, I would encourage you do to that first .
After posting the previous articles, I received a lot of e-mails from SharePointers asking how to rename the items in the list form toolbar. That’s why I decided to write Part 3 in the series. After I finished writing the article and taking some snapshots, another SharePointer asked me on MSDN Forums if it’s possible to remove the Text while retaining the images, for instance, removing “Delete Item” while retaining the (X) rendered beside it. Today I’ll show you to do both tasks by JavaScript.
Trick #4: Renaming List Form Toolbar Items!
Sometimes, you need to rename some items in the toolbar rendered at the top of DispForm.aspx to match the List Name. For instance, you have a custom list named “Programs” that stores the courses offered by a university. It would be better to have “New Program” rather than the default “New Item” and “Edit Program” rather than “Edit Item”. Sometimes, you just need to totally delete the text and just leave the images with a tooltip that explains the action performed on clicking them.
Before
After
This function can be used to achieve both tasks, just call the function passing the old and new names of the item. For instance if you need to rename “Add Item” to “Add Program”, use renameFormMenuItems(“Add Item”,”Add Program”);. In case you need to remove the text and leave the image, call the function passing an empty string as the new name as follows: renameFormMenuItems(“Delete Item”,””);.
Kindly note that the function is case sensitive, so “New Item” will work while “nEw iTeM” is not gonna work.
Nice and easy, isn’t it?
Now a question is imposing itself, how can we use this function? The answer is the content editor web part; please refer to trick #3 in the previous article for more information.
What about hiding the toolbar altogether?
There are a lot of solutions that imply unghosting the page using SharePoint Designer, but I don’t prefer those solutions! Again, let’s perform this task using JavaScript. I’ve included two functions in the zip file, one for renaming the toolbar items and the other for hiding the toolbar altogether! Waiting for your feedback.
