I’m glad to announce that the slide-deck & video recording for my session at SP24 Conference are now available.


For watching my session recording, click here.
For viewing the slides, click here.
For the other sessions, click here.
I’m glad to announce that the slide-deck & video recording for my session at SP24 Conference are now available.
For watching my session recording, click here.
For viewing the slides, click here.
For the other sessions, click here.
I’m extremely happy to announce that my session (#SPC273) from the SharePoint Conference 2014 (#SPC14) on “Application Lifecycle Management in Office and SharePoint” is now available on Channel 9. This means that now you can view the slide-deck, download it or download the full session recording.
To complement my SPC14 session, I’ve recorded a 25-min video to show how to create a fully automated continuous deployment process for SharePoint Apps (Build – Deploy – Trust – Test – Report). I’ve quickly explained the theory in the session but I didn’t have time to show the full process, so I highly recommend that you watch the session first before watching the complementary video.

Note : You might also want to check this blog post (Automated Testing Challenges for SharePoint Apps – Trusting the app!) for additional details about the App Trust workaround!
Many architects are trying to establish a fully automated continuous deployment process for their SharePoint apps. While automating the build, packaging & deployment is fairly simple (check this), there is a big challenge that is preventing architects and developers from reaching the full automation stage. That’s is “Trusting the App“!
Following the deployment of the application components (to pre-prod environments), it is important to note that before anyone accessing the application, including automated tests that may be part of the build, a tenant (or site collection) administrator will have to trust the application on the app information page in SharePoint. This is usually a manual process and there is no way to trust your app through PowerShell or .NET CSOM but there is a trick that I use for achieving a full automation! PowerShell IE Automation!
Here is the script that I use from within my deployment script:
$url = “$($web.Url.TrimEnd(‘/’))/_layouts/15/appinv.aspx?AppInstanceId={$($appInstance.Id)}”
$ie = New-Object -com internetexplorer.application
try
{
$ie.visible=$true
$ie.navigate2($url)
while ($ie.busy)
{
sleep -milliseconds 60
}
$trustButton = $ie.Document.getElementById(“ctl00_PlaceHolderMain_BtnAllow”)
$trustButton.click()
sleep -Seconds 1
Write-Host “App was trusted successfully!”
}
catch
{
throw (“Error Trusting App”);
}
finally
{
$ie.Quit()
}
You just need to add the code above to your deployment script and VOILA. You no longer need to suspend the testing process until the application is trusted. Now a completely “Build-Deploy-Test workflow” is possible!
Finally, I would like to give some credit to Alexander Brassington, his blog post about automated publishing for content types using PowerShell IE Automation inspired me. Although, the post is completely unrelated to Build Automation, it helped a lot on coming up with the workaround!
This is the 3rd article of a series of posts on SharePoint 2013 & Office 365 Application Lifecycle Management:
Introduction
In the previous post, I have quickly given you an overview on the full ALM environment that we will be building. The environment comprises some on-premises components & services as well as some cloud services. The on-premises components & services will be combined & hosted in three Virtual Machines as explained earlier.
Here is a quick summary for our full ALM environment:
|
On-Premises |
Cloud |
|
VM1 : Development Machine |
O365 Tenant for Development + |
|
VM2 : TFS Build Machine |
Visual Studio Online (TFS Service) |
|
VM3 : Test Machine |
O365 Tenant for Testing |
|
O365 Tenant for Production |
The reason for having the setup above might not be fully understood at this point. Don’t worry, this will become crystal clear as we move forward.
In today’s post we’ll start creating & provisioning the components & services needed to support our SharePoint Server 2013/ Office 365 development efforts. This will require some on-prem components as well as some cloud services.
Development Environment Considerations
At the end of the previous post, I’ve included some very important exercises. One of which was reading the “Development environment Considerations” section of this MSDN Article. If you haven’t done so, I’d encourage you to read it first before moving forward with this post.

Figure 1. Development environment components and tools
Source: SharePoint Server 2013 Application Lifecycle Management
Creating an O365 development site
With an O365 development site, you can start creating & deploying applications that will be hosted in Office 365, on-premises or on other infrastructure in a provider-hosted model. The benefit of this environment is that infrastructure, virtualization and other hosting considerations for a SharePoint development environment are abstracted by Office 365, allowing you to create applications instantly. A prime consideration for this type of development environment is that applications that require full trust code to be deployed to SharePoint cannot be accommodated as shown in the figure below:

Figure 2. Office 365 App Development
Source: SharePoint Server 2013 Application Lifecycle Management
If you are planning to develop Provider-hosted Apps with the Provider-hosted component hosted on Windows Azure, you will to get an Azure Subscription. Actually, I’m going to show you this scenario in one of the upcoming posts.
Use the steps below to obtain and provision an O365 development site & an Azure subscription:
2. Provision the developer site by following the instructions explained in this article.
3. Get a Windows Azure trial subscription from here.
Now, you have all what you need to develop SharePoint-hosted, Autohosted & provider-hosted (azure-hosted) apps for Office 365!
Creating a Self-contained farm environment (virtualized farm development)
For those solutions that require the deployment of full trust code to run on a SharePoint farm, a full implementation of SharePoint Server 2013 will be required. In our case, we’ll be creating and using a virtualized development machine. I’ll refer to this as the Dev Machine from this point onwards.

Figure 3. On-premises development with a virtual environment
Source: SharePoint Server 2013 Application Lifecycle Management
SharePoint has always been known to require a good deal of resources, and that requirement continues to grow. A single server setup, running SQL Server and SharePoint, with all available services requires 24 GB of RAM. This is a rather large amount even for a production server, let alone a development environment. Microsoft states that for a single server development environment, 8 GB is required to run the minimum recommended services. If Visual Studio 2013 is also running, RAM the requirements increase to 10 GB. These requirements seem rather difficult to satisfy considering most SharePoint development is done on laptops with 8 GB of RAM. To get SharePoint 2013 to run smoothly on a VM with 4-6 GB, we will run only the necessary services. This means no Excel services, workflow services, or search. The most that can be done with an environment like this will be to configure sites and build simple solutions & apps. Use this guide to create a full self-contained development machine.
Before proceeding with the steps outlined in the guide, please note the following:
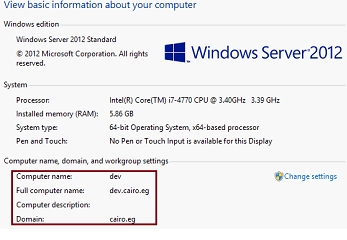
Figure 4. Computer and domain configurations
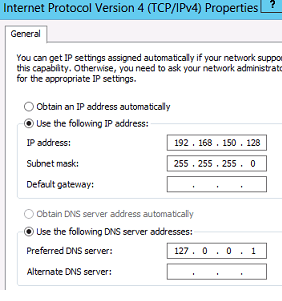
Figure 5. IP Configurations

Figure 7. Forward lookup zone with a wildcard DNS entry


Figure 7. Configure App URLs using Central Administration
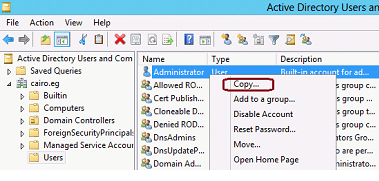
Figure 8. Clone an Active Directory User Account

Figure 9. SharePoint Farm Administrators
Creating an On-Prem Development Site (Remote Development)
If you choose not to use Office 365 developer sites as a primary means for SharePoint application development, on-premises developer sites can be used to develop SharePoint applications. In this model, the Office 365 developer sites’ capability is replaced with on-premises developer sites hosted within a SharePoint farm. The on-premises developer site can be used to deploy SharePoint-hosted & Provider-hosted apps. You cannot use this model for deploying Auto-hosted apps.
Figure 10. On-premises app development with the developer site template
Source: SharePoint Server 2013 Application Lifecycle Management
To create an on-prem developer site, you can follow the steps outlined in this post. Please make sure first that you have properly configured your dev machine for SharePoint apps as explained above.
Summary:
In this post, we have created a self-contained virtualized farm (with an on-prem Developer Site) and an O365 tenant (with a SharePoint Online Developer Site). We have also obtained a Windows Azure Trial subscriptions. We will be using those Development environments to explain & try several ALM scenarios for both SharePoint Server 2013 & Office 365 SharePoint Online.
The crossed-out components in the table below are the ones we have created so far. In the next post, we will be building and provisioning our ALM Platform; that is VM2 (which will host Team Foundation Server 2013 on-prem) & Visual Studio Online (TFS Service or TFS Online).
|
On-Premises |
Cloud |
|
VM1 : Development Machine |
O365 Tenant for Development + |
|
VM2 : TFS Build Machine à Next Post |
Visual Studio Online (TFS Service) à Next Post |
|
VM3 : Test Machine |
O365 Tenant for Testing |
|
O365 Tenant for Production |
Exercises:
While waiting for the next post, I would like you to do the following:
| Exercise 1 | Download the following Software: Team Foundation Server 2013 |
| Exercise 2 (Optional) | If you are not familiar with Visual Studio Online, please read this article. |
| Exercise 3 (Optional) |
If you are not familiar with Team Foundation Server, please read this article. |
This is the second article of a series of posts on SharePoint 2013 & Office 365 Application Lifecycle Management:
Throughout the series, we will be trying different scenarios for creating, deploying, building, testing & releasing solutions / applications that are based on SharePoint technologies, for both on-premises and in hosted or public cloud platforms. We will be also be switching between Team Foundation Server (On-premises) & Visual Studio Online (TFS Service) as an ALM Platform. This is to leave you comfortable with both platforms then you can decide later which option suits you the best.
In today’s post, I will give you a quick overview on the complete ALM environment that we will be creating in the next three posts. This infrastructure will then be used in our learning journey to apply the different ALM practices to SharePoint development.
Our ALM Environment
The environment that we will be creating includes some on-premises components & services as well as some cloud services.
Here are the main on-premises components & services needed for our ALM environment:
You can of course setup each of the above on-premises roles on a separate Physical or Virtual machine. In my case, I want to minimize the infrastructure needed therefore I will combine some of them to live side-by-side.
| VM Name | On-prem Components & Services |
| Dev Machine | Active Directory Domain Services SharePoint 2013 Development Farm |
| TFS Build Machine | Team Foundation Server 2013 Team Foundation Build Service 2013 Visual Studio 2013 Test Controller Release Management Server |
| Test Machine | SharePoint 2013 Integration & System Testing Farm |
As for the Cloud part of our ALM environment, the following services are needed:
And here is a combined view for the full environment:
|
On-Premises |
Cloud |
|
VM1 : Development Machine |
O365 Tenant for Developing O365 Apps + |
|
VM2 : TFS Build Machine |
Visual Studio Online (TFS Service) |
|
VM3 : Test Machine |
O365 Tenant for Testing O365 Apps |
|
O365 Tenant for Production |
Please note the following:
Throughout the next three posts, I’ll walk you through the exact steps needed for creating the full ALM environment, this includes both; the on-prem part and the cloud part.
To get prepared for the next post, I would like to leave you with the following homework:
| Exercise 1: | Read the “Development environment considerations” section of this MSDN article.
This section describes the development environment considerations for SharePoint application developers and development teams. I cannot stress enough the importance of reading this section before proceeding to the next post. |
| Exercise 2: | Prepare the physical machine that will host the three Virtual Machines that we will start creating in the next post. In my case I’m using Windows 8.1 with Hyper-V enabled. To enable Hyper-V on Windows 8/8.1, you can follow the instructions in this article.You will also need to create two Virtual Network Switches (Private & External) in Hyper-V as shown in the figure below :  We’ll connect our Virtual Machines to both switches in the next posts.Note: You can use other Virtualization Technologies (VMWare, Oracle VirtualBox, etc…) if you would like to. We’ll connect our Virtual Machines to both switches in the next posts.Note: You can use other Virtualization Technologies (VMWare, Oracle VirtualBox, etc…) if you would like to. |
| Exercise 3: | Download the following software: Windows Server 2012· SQL Server 2012 SP1 SharePoint Server 2013 Visual Studio 2013 Ultimate |
There are several methods to customize SharePoint. Developers have the option of creating new cloud applications for SharePoint or maintaining legacy full trust code. Coupled with the complexity many organizations have in terms of managing SharePoint customizations across Office 365 and on-premises implementations, developers and solution architects will need to understand how to adjust application lifecycle management (ALM) techniques to support and deploy quality solutions. This series of blog posts will focus on the establishment of development, testing and deployment best practices for on-prem and cloud applications and solutions. This will also include concepts such as continuous integration, release management and automated testing.
If you think that you’ve read this introduction before, that’s true, it’s the description of my session at the upcoming SharePoint Conference:

While working with my co-presenter, Eric Charran (Microsoft), on the session content & demos, I’ve decided to put together a series of posts to cover the same topic in more depth while focusing on the How aspect.
The full series is based on the best practices and guidance that was put together by some Microsoft folks (Eric Charran, Vesa Juvonen, & Steve Peschka) in this MSDN article.

The article applies common application lifecycle management (ALM) concepts and practices to application development using SharePoint & Office 365 technologies. This series is intended to complement the MSDN article by providing the “How” aspect of doing things. In fact, I’ll be referring to the article in almost every post instead of explaining the theory behind each task / exercise (I’m not a fan of reinventing the wheel).
One thing to note here is that the series is intended to be educational, the lab environment setup (will be covered in the next post) was done in a way that enables you to easily follow along, focus on what we want to achieve without spending too much time focusing on the infrastructure & security side of things. I’ve also broken some rules that are highly recommended to follow in production environments; you will find me ignoring the least privilege accounts principles and using the domain administrator account for setting up almost everything in SharePoint & Team Foundation Server (including all its components), you will also find me combining many services on one virtual machine. This is OK for educational purposes.
However, I’ll be giving you some guidance from time to time on how to setup a real-life Application Lifecycle Environment for SharePoint 2013 & Office 365 SharePoint Online. I’ll also provide you with some links for some of the best resources out there on the internet that can help you on installing & configuring the components needed for building a comprehensive ALM environment for SharePoint 2013 & Office 365. This means that you can still follow along in case you are willing to implement a real-life ALM environment.
Another thing also to note here is that I’ll be explaining how to apply the ALM practices using Team Foundation Server 2013 (on-prem), Visual Studio Online (The cloud offering of TFS) and a hybrid approach. So if you don’t have enough infrastructure or you’re a cloud fan, you can still follow along and choose the option that best suits you.
While you’re waiting for the next post, I’d like to leave you with the following small exercises:
|
Exercise 1 |
Read the “Overview of Application Lifecycle Management” part of the MSDN article. That’s only the first part.
|
|
Exercise 2 (Optional) |
If you are not familiar with the new development options in SharePoint 2013, please refer to the following articles : SharePoint 2013 development overview Choose patterns for developing and hosting your app for SharePoint |

